Manually Provisioning a Cisco 3PCC Phone in the Vodia PBX
Published on:
July 9, 2026
Vodia now supports provisioning for Cisco 3PCC phones, giving businesses and service providers a clearer way to connect compatible Cisco multiplatform IP phones to the Vodia PBX. Admins can add supported Cisco devices through Vodia Device Management, pair them with extensions, and configure provisioning settings through the phone’s web interface. This expands Vodia’s supported device ecosystem while helping customers continue using trusted Cisco IP phones within their existing business phone system.
Vodia now supports provisioning for Cisco 3PCC phones in the Vodia PBX, giving businesses and service providers a straightforward way to connect compatible Cisco multiplatform IP phones to their phone system. This guide explains which Cisco 3PCC models can be provisioned, how to add the device in Vodia Device Management, how to pair it with an extension, and what to check if provisioning fails.
3PCC - Third-Party Call Control
3PCC (Third-Party Call Control) is a call control architecture wherein a third-party controller initiates and manages calls between two endpoints: the controller first connects the call to one endpoint, then to the second endpoint to link both endpoints in a two-party call. With 3PCC, applications can place calls similar to the way an operator does; it also supports click-to-dial, so users can make calls by clicking a link in their browsers.
Which Cisco Phones Can Be Provisioned in the Vodia PBX?
Cisco IP phones with 3PCC in their model number or PID indicate they run multiplatform firmware designed for third-party call control environments, such as the CP-8841 and the 3PCC-K9 (both multiplatform phones).
Migration between Enterprise firmware and Multiplatform/3PCC firmware is supported for certain Cisco 7800 and 8800 series IP phones.
The Cisco BTS 10200 Softswitch supports calls from a 3PCC controller by handling SIP calls where the initial INVITE message doesn’t include SDP.
The term "3PC" or "3pc" also appears as an IP protocol registered with IANA as IP Protocol 34, known as the Third Party Connect Protocol - this protocol is supported in Cisco IOS and NBAR2 protocol packs. Once these phones are provisioned, they can be white-labeled.
Manually Provisioning a Cisco 3PCC Phone
Confirm the phone type
Before starting, confirm the Cisco phone is running 3PCC / MPP firmware.
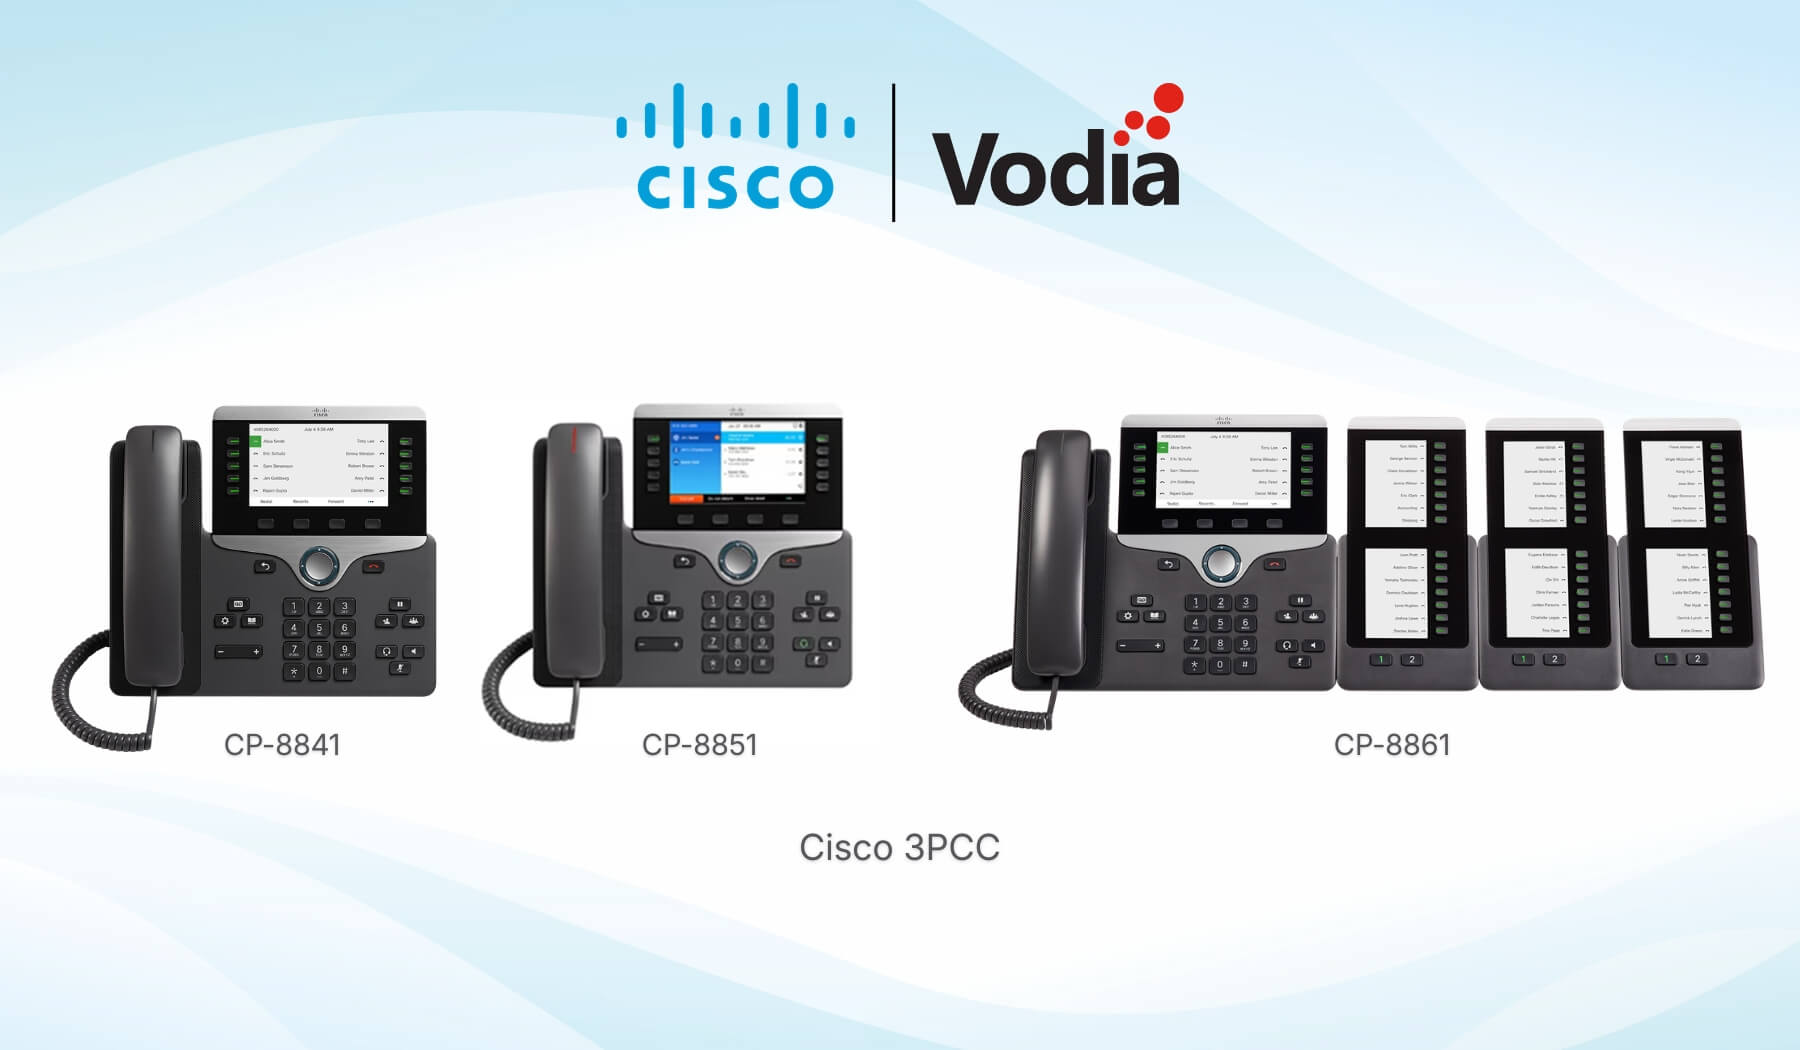
This guide applies to Cisco phones such as:
Cisco CP-8841-3PCC
Cisco CP-8851-3PCC
Cisco CP-8861-3PCC
It does not apply to Cisco phones running standard CUCM enterprise firmware.
1. Factory reset the Cisco phone
Start with a factory reset so the phone does not keep any old provisioning, SIP, or admin settings.
Power down the Cisco phone.
Hold the # key.
While holding #, power the phone back on.
Keep holding # until the mute key light turns off.
Start entering the reset sequence:
123456789*0#
When you press 1 to begin the sequence, the headset light will turn off to confirm the sequence has started.
After the full sequence is entered, the phone will factory reset and reboot.
2. Create or confirm the Vodia extension
In the Vodia PBX, create or open the user/extension to be assigned to the phone.
Create a Vodia Extension. Ensure you set a Web and SIP password. You will use this to log in to the phone’s address after it has been provisioned.
3. Add the device in Vodia Device Management
Before manually configuring the phone, add the device in Vodia so the PBX knows which phone is being paired and which extension belongs to it.
In Vodia, go to:
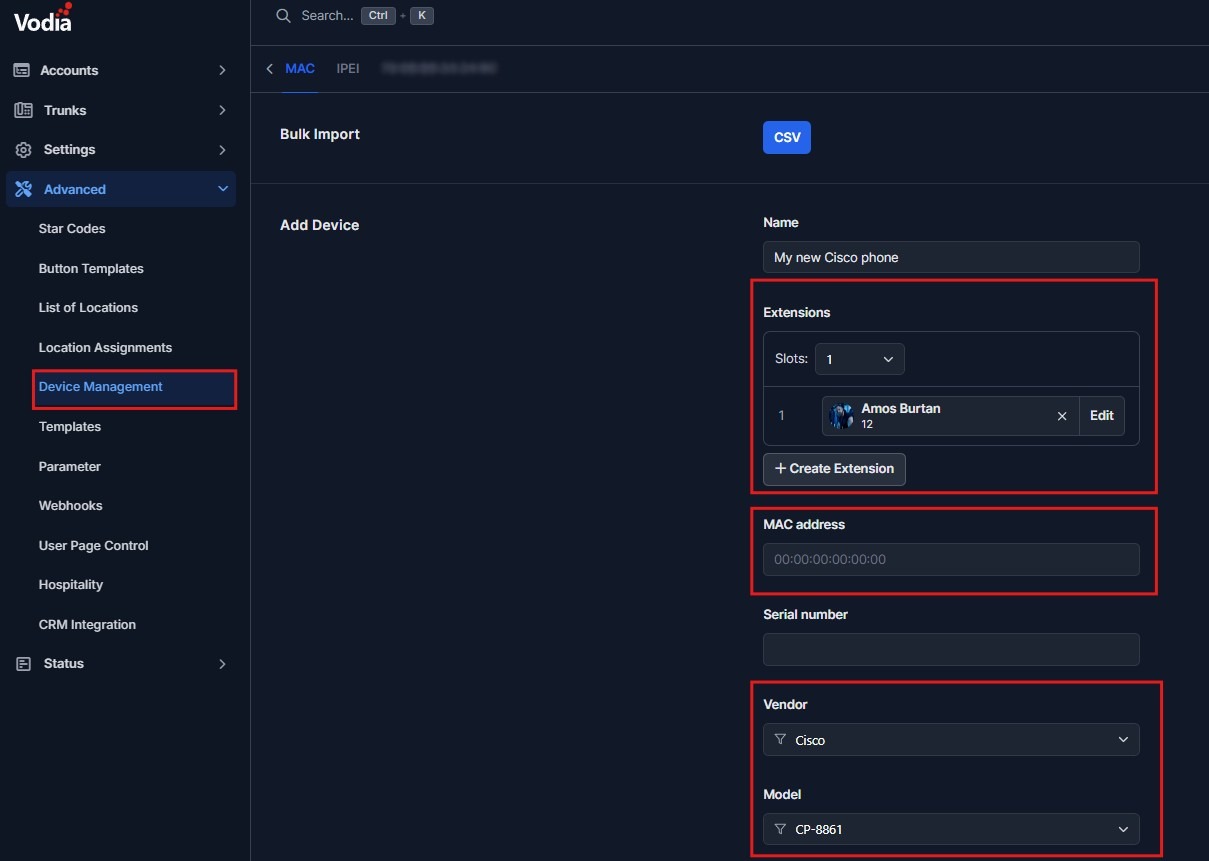
Tenants → Advanced → Device Management
Then add the phone using the MAC tab.
Enter the device details:
Name: a friendly device name, for example, Reception Cisco Phone
Extension: select the Vodia extension/user that/who should be assigned to the phone
MAC address: enter the phone’s MAC address
Serial number: enter the phone serial number, if available
Vendor / Manufacturer: select Cisco
Model: select the correct Cisco model, for example, CP-8851, CP-8861, etc.
SIP transport: leave as default unless the PBX administrator has specified UDP, TCP, or TLS
The most important value is the MAC address. Make sure it matches the phone exactly.
Example MAC formats:
Phone label/display format: 70:6X:XX:XX:X4:9C
Provisioning filename format: 706XXXXXX49C (add this in Vodia)
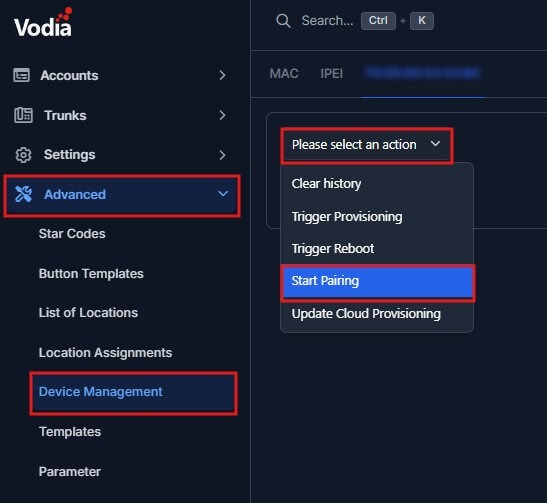
After adding or selecting the phone, start pairing:
Select the phone → Please select an action → Start Pairing
The PBX keeps the pairing active for approximately 30 minutes.
If the pairing window expires, select the phone again and click:
Start Pairing
4. Connect the phone to the network
Connect the Cisco phone to the network and allow it to obtain an IP address using DHCP.
On the phone, check the IP address from the device menu:
Applications → Status → Network Status
Make sure the phone has:
IP address
Gateway
DNS server
NTP server or valid time source
5. Log in to the Cisco web interface
Open a browser and go to:
http://<phone-ip-address>/
Then select:
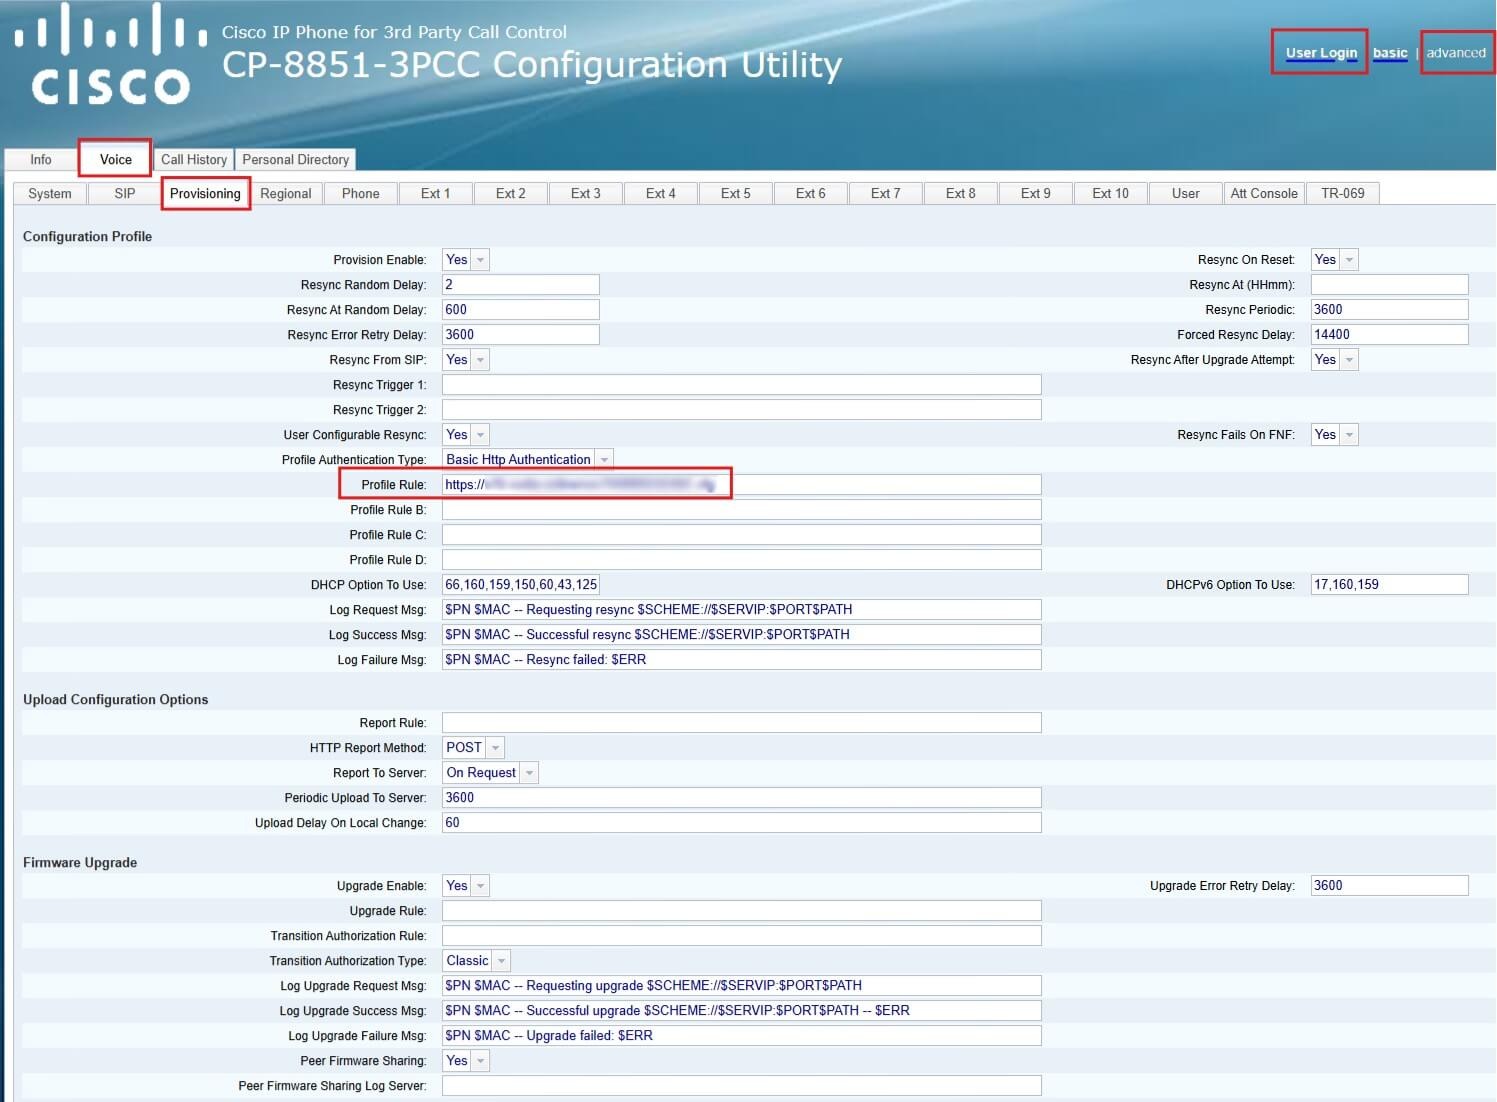
Admin Login → advanced
6. Provision Cisco on Vodia
If using Vodia provisioning, go to:
Voice → Provisioning
Set the Profile Rule to the provisioning URL provided by the Vodia administrator.
Example format:
https://<vodia-server>/csc$MA.cfg
After setting the Profile Rule, click:
Submit All Changes
Then reboot the phone.
7. Save the configuration
Click:
Submit All Changes
The phone may reload its SIP configuration or reboot. If it doesn’t reboot, feel free to reset the phone.
8. Basic troubleshooting
If the phone shows:
Failed - Not Reachable
Check:
The phone has working DNS
The phone has the correct gateway
The PBX hostname is correct
The SIP transport and port are correct
Firewall rules allow SIP traffic
The proxy field does not include https://
If the phone shows an authentication failure, check:
Extension number
User ID
Auth ID
SIP password
Vodia tenant/domain assignment
If provisioning does not work, check:
The phone MAC address in Vodia
The selected vendor/manufacturer and model
The provisioning URL
Whether the phone is requesting the correct config file
At Vodia, we continue to improve and refine our PBX - our mission is to provide enterprises and SMEs with the most feature-rich, flexible, scalable, robust, secure platform for peerless business communication and a future-proof communications ecosystem. Cisco phones are just some of our supported devices. To find out more about what we do, and how we do it so well, get in touch with us, sales@vodia.com, +1 (617) 861-3490.
Switching phone systems doesn’t have to mean rebuilding everything from scratch. The Vodia PBX migration tool imports key configuration data from backups, including extensions, ring groups, queues, desk phones, and basic auto-attendant settings. Built into the Vodia Admin Portal, it guides administrators through the import process and reduces repetitive manual work, whether you’re moving 10 extensions or 1,000. Explore what transfers, what needs manual setup, and how the built-in tool reduces repetitive work when moving to Vodia.
Apps have changed how businesses communicate and work, but every digital experience still depends on physical hardware. From smartphones, desk phones, and headsets to networking equipment and cloud servers, reliable infrastructure supports productivity, security, and call quality. Here’s why hardware still matters in an app-first world and what businesses should consider when choosing dependable devices and secure connectivity for the office, hybrid teams, and remote work, while preparing for evolving technology.
Vodia Wallboards gives supervisors, contact centers, service providers, and operations teams a self-hosted, real-time view of Vodia call queue activity. Monitor waiting, ringing, and active calls; agent availability; service levels; abandoned calls; and queue trends across one or more Vodia PBX systems. Start with a ready-made layout or build a custom wallboard using queue filters, live widgets, AI summaries, and alerts. Display the information your teams need in a browser, on an operations dashboard, or on a dedicated TV screen.
.svg)