This article explains how to configure a SIP trunk with VoIP.ms on the Vodia PBX, starting with ensuring your system is properly set up with NAT, firewall checks, and correct SIP settings. After configuring your VoIP.ms account, including setting the device type and dialing mode, you'll gather necessary details like the username, password, DID numbers, and registrar server. In the Vodia PBX, create a new SIP trunk and input the VoIP.ms settings such as registrar, username, and password. You'll then configure how incoming calls are routed, either based on the Request-URI or directing them to a specific account. Once completed, save the settings and the trunk will register automatically (with the dial plan generated for you).
The Vodia PBX offers a complete, out-of-the-box unified communications solution. As an open standards software PBX, installation and management of your phone system have never been easier.
In this article, we will discuss how to set up your VoIP.ms SIP trunk with the Vodia PBX phone system.
System Prerequisite
Before configuring the SIP trunk in the Vodia PBX, go through the following checklist and make changes where necessary:
The first thing is adjusting the Device type. To do so, navigate to Main Menu → Account settings → Inbound Settings and make sure the Protocol for Inbound DIDs is set to “SIP”, that the Device type is set to “IP PBX Server”, and apply any changes made.
Dialing mode
Next, we are going to set our dialing mode under General setting. Choose American Numbering Plan Administration (NANPA) and apply the changes.
DID Management
Make sure the DIDs ordered are linked to your account. To do so, navigate to DID Numbers / Manage DID(s). Click on the Edit DID icon and make sure the routing points to SIP/IAX on your main account.
Save the configuration when choosing the correct account.
Account information
To register and operate the trunk in Vodia PBX, you will have to collect some information necessary for the configuration of the trunk.
Username: The username for registering the trunk can be found under Main Menu → Account Information
Password: The trunk password can be found in the email you received from VoIP.ms during the registration process. You can also change the password by navigating to Main Menu → Account Settings → Security.
DID Number: The DID numbers can be viewed by navigating to DID Numbers → Manage DID(s)
Registrar: Go to Main Menu → Account Settings → Default DID Routing. From here, make note of the selected server. In this example, the server in New York (newyork.voip.ms) will be the one used for our configuration.
Configuring the Trunk on the Vodia PBX
The general instructions outlining how to add a new SIP Trunk to Vodia PBX can be found here.
To create a SIP trunk, navigate to your domain and choose VoIP Providers in the left-hand panel, then click the plus button to create a trunk. Choose "other" under the setting provider.
Type of SIP is registration
Name: VoIP.ms
Outbound Proxy address: is the registrar assigned under Menu → Account Settings → Default DID Routing of your VoIP.ms account, example (newyork.voip.ms)
User name: Your VoIP.ms user account found under Main Menu → Account Information
Password: VoIP.ms password found under Main Menu → Account Settings → Security
Press create to complete the configuration.
Vodia Trunk settings
We will need to change a few settings to complete the VoIP.ms trunk configuration. Click on your newly created trunk.
Under Display Name: add your DID number
Account: add you SIP user account
Domain name: add your registrar proxy - this should be the proxy address found under Menu → Account Settings → Default DID Routing in your VoIP.ms account
Explicitly list address for inbound traffic: Enter the IPV4 of your registrar proxy; for example, you can ping newyork.voip.ms (72.251.239.196) or, if you're not sure, check which registrar server you have chosen under Menu → Account Settings → Default DID Routing.
Routing /Redirection
We need to configure the Vodia PBX to handle incoming calls on the system. Let's scroll down to Routing / Redirection.
Under (Destination for incoming call) you will be presented with a drop-down with five routing settings. We will only focus on two of the settings - you can choose the best one for your needs.
Send calls to the destination in the Request-URI: The Vodia PBX will look at the request URI on an inbound call - for example, SIP:8573438189@72.251.229.53:5060 SIP/2.0. if this DID is present on the system, Vodia will simply send the call to the specific extension or account on the system. To add a DID to your extension, simply navigate to Accounts ---> Extension in your domain, choose an extension to which you would like to append the DID: for example, 440 is the extension account, then space and the DID number 440 9784567654. You can add multiple DIDs to an extension by simply repeating the same process; 440 9784567654 9784567654 9784567654, etc.
Send all calls to a specific account: You can use this setting to send a call to a specific account on the system; under (Default Account), Vodia will present to a list of users and accounts on the system.
Once you have finished configuring your trunk settings, scroll to the button of the page and press save. At this point, if you refresh the page under VoIP provider, you should see your VoIP.ms Trunk appear as registered. The Vodia PBX will automatically create a dial plan for your domain. If you would like to edit the dial plan, navigate to Trunks --->VoIP Provider ---->Dial plan
Let us know if you run into any issues - send us an email at support@vodia.com
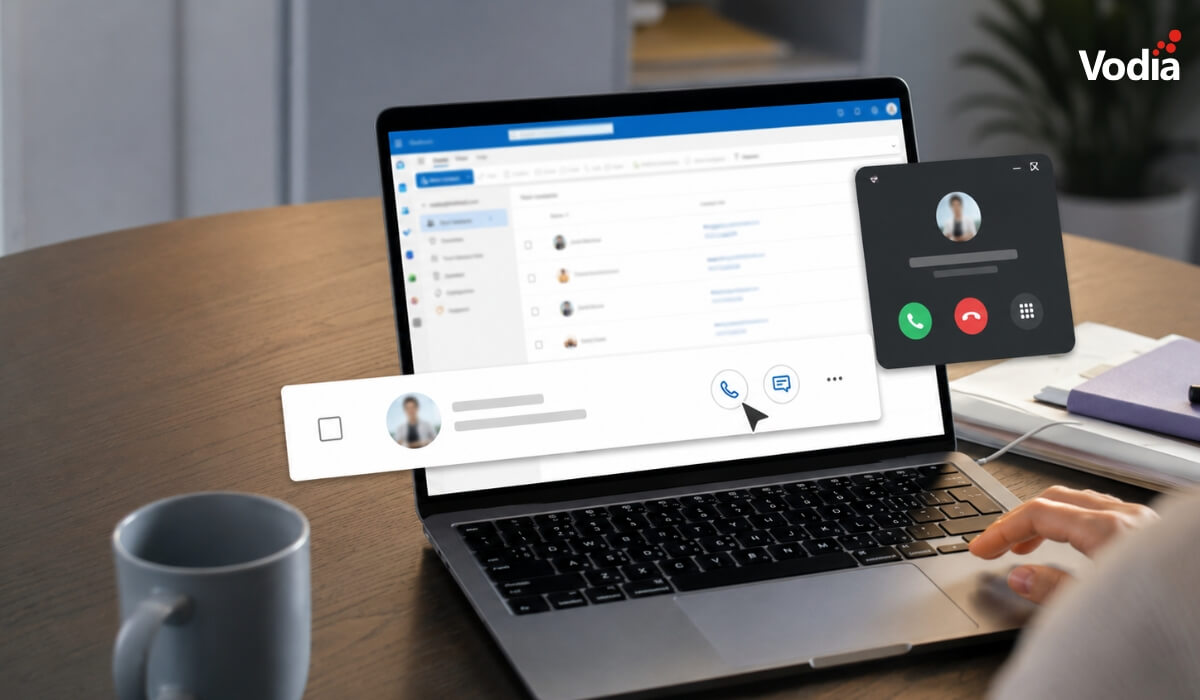
Der Vodia Hub erweitert Windows um „Click-to-Call“-Funktionen und die Steuerung von Anrufen über den Desktop und erleichtert es den Benutzern so, Anrufe direkt aus den Anwendungen heraus zu tätigen, anzunehmen, zu verwalten und zu automatisieren, die sie ohnehin täglich nutzen. Mit der systemweiten Verarbeitung von „tel:“-Links, Popup-Fenstern für eingehende Anrufe, Warteschlangendetails und Unterstützung für Automatisierungsfunktionen hilft Vodia Hub dabei, die Vodia-PBX mit Outlook, CRM-Systemen, Browsern, Dokumenten und anderen Windows-Tools zu verbinden. Benutzer können weiterarbeiten, ohne Telefonnummern manuell kopieren, das Benutzerportal öffnen oder zwischen Anwendungen wechseln zu müssen, nur um einen Anruf zu bearbeiten.
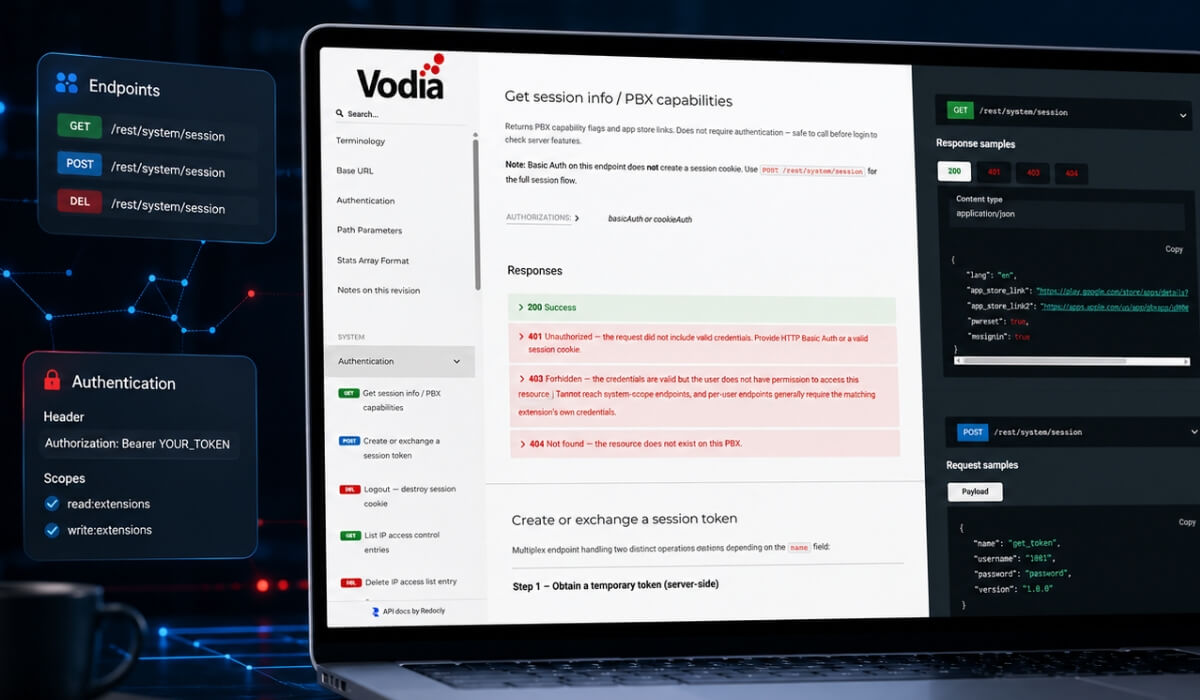
Vodia hat die Dokumentation zur PBX-REST-API für Version 70 und höher aktualisiert und dabei für eine übersichtlichere Struktur, eine einfachere Navigation, Beispielantworten sowie eine OpenAPI-Spezifikation gesorgt. Die aktualisierte API-Referenz bietet Dienstanbietern, Unternehmen, Partnern und Entwicklern einen praxisorientierteren Ausgangspunkt, um verfügbare API-Aufrufe zu erkunden, das Verhalten von Anfragen und Antworten zu verstehen und Integrationen rund um reale PBX-Workflows zu entwickeln, darunter CRM-Anbindung, automatisierte Bereitstellung, Berichterstellung, Analysen, Anrufdaten und Workflow-Automatisierung.
Sowohl Festnetztelefone als auch mobile Apps haben ihren Platz in der modernen Geschäftskommunikation. IP-Festnetztelefone sind nach wie vor eine gute Wahl für Rezeptionisten, Support-Teams, Kundendienstmitarbeiter und Mitarbeiter, die von einem festen Standort aus ein hohes Anrufaufkommen bewältigen. Mobile Apps hingegen ermöglichen Remote-Nutzern, Hybrid-Nutzern und Außendienstmitarbeitern den Zugriff auf ihre geschäftliche Durchwahl, egal wo sie arbeiten. Für viele Unternehmen besteht die beste Lösung nicht darin, sich für das eine oder das andere zu entscheiden, sondern beide über dieselbe PBX-Umgebung zu nutzen, damit jeder Nutzer das für seine Arbeit passende Werkzeug zur Verfügung hat.
.svg)